Disposition de grille Java
La classe Java GridLayout est utilisée pour organiser les composants dans une grille rectangulaire. Un composant est affiché dans chaque rectangle.
Constructeurs de la classe GridLayout
Exemple de classe GridLayout : utilisation du constructeur GridLayout()
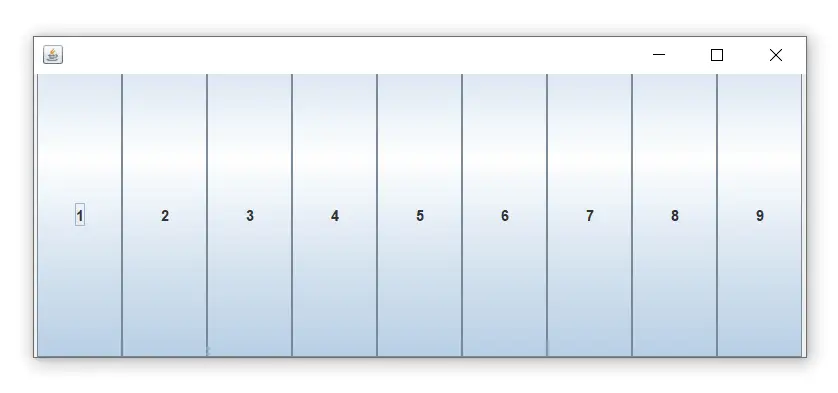
Le constructeur GridLayout() crée une seule ligne. L'exemple suivant montre l'utilisation du constructeur sans paramètre.
Nom de fichier: GridLayoutExample.java
// import statements import java.awt.*; import javax.swing.*; public class GridLayoutExample { JFrame frameObj; // constructor GridLayoutExample() { frameObj = new JFrame(); // creating 9 buttons JButton btn1 = new JButton('1'); JButton btn2 = new JButton('2'); JButton btn3 = new JButton('3'); JButton btn4 = new JButton('4'); JButton btn5 = new JButton('5'); JButton btn6 = new JButton('6'); JButton btn7 = new JButton('7'); JButton btn8 = new JButton('8'); JButton btn9 = new JButton('9'); // adding buttons to the frame // since, we are using the parameterless constructor, therfore; // the number of columns is equal to the number of buttons we // are adding to the frame. The row count remains one. frameObj.add(btn1); frameObj.add(btn2); frameObj.add(btn3); frameObj.add(btn4); frameObj.add(btn5); frameObj.add(btn6); frameObj.add(btn7); frameObj.add(btn8); frameObj.add(btn9); // setting the grid layout using the parameterless constructor frameObj.setLayout(new GridLayout()); frameObj.setSize(300, 300); frameObj.setVisible(true); } // main method public static void main(String argvs[]) { new GridLayoutExample(); } } Sortir:

Exemple de classe GridLayout : utilisation du constructeur GridLayout (int rows, int columns)
Nom de fichier: MyGridLayout.java
import java.awt.*; import javax.swing.*; public class MyGridLayout{ JFrame f; MyGridLayout(){ f=new JFrame(); JButton b1=new JButton('1'); JButton b2=new JButton('2'); JButton b3=new JButton('3'); JButton b4=new JButton('4'); JButton b5=new JButton('5'); JButton b6=new JButton('6'); JButton b7=new JButton('7'); JButton b8=new JButton('8'); JButton b9=new JButton('9'); // adding buttons to the frame f.add(b1); f.add(b2); f.add(b3); f.add(b4); f.add(b5); f.add(b6); f.add(b7); f.add(b8); f.add(b9); // setting grid layout of 3 rows and 3 columns f.setLayout(new GridLayout(3,3)); f.setSize(300,300); f.setVisible(true); } public static void main(String[] args) { new MyGridLayout(); } } Sortir:
téléchargez cet exemple Exemple de classe GridLayout : utilisation du constructeur GridLayout (int rows, int columns, int hgap, int vgap)
L'exemple suivant insère des espaces horizontaux et verticaux entre les boutons à l'aide du constructeur paramétré GridLayout (int rows, int columns, int hgap, int vgap).
Nom de fichier: GridLayoutExample1.java
// import statements import java.awt.*; import javax.swing.*; public class GridLayoutExample1 { JFrame frameObj; // constructor GridLayoutExample1() { frameObj = new JFrame(); // creating 9 buttons JButton btn1 = new JButton('1'); JButton btn2 = new JButton('2'); JButton btn3 = new JButton('3'); JButton btn4 = new JButton('4'); JButton btn5 = new JButton('5'); JButton btn6 = new JButton('6'); JButton btn7 = new JButton('7'); JButton btn8 = new JButton('8'); JButton btn9 = new JButton('9'); // adding buttons to the frame // since, we are using the parameterless constructor, therefore; // the number of columns is equal to the number of buttons we // are adding to the frame. The row count remains one. frameObj.add(btn1); frameObj.add(btn2); frameObj.add(btn3); frameObj.add(btn4); frameObj.add(btn5); frameObj.add(btn6); frameObj.add(btn7); frameObj.add(btn8); frameObj.add(btn9); // setting the grid layout // a 3 * 3 grid is created with the horizontal gap 20 // and vertical gap 25 frameObj.setLayout(new GridLayout(3, 3, 20, 25)); frameObj.setSize(300, 300); frameObj.setVisible(true); } // main method public static void main(String argvs[]) { new GridLayoutExample(); } } Sortir: