Matplotlib.pyplot.subplots() în Python
Matplotlib este o bibliotecă în Python și este o extensie numerico-matematică pentru NumPy bibliotecă. Pyplot este o interfață bazată pe stare pentru un modul Matplotlib care oferă o interfață asemănătoare MATLAB. subplots()> funcția din Python simplifică crearea mai multor subploturi Matplotlib într-o singură cifră, permițând vizualizarea organizată și simultană a diferitelor seturi de date sau diagrame.
Exemplu:
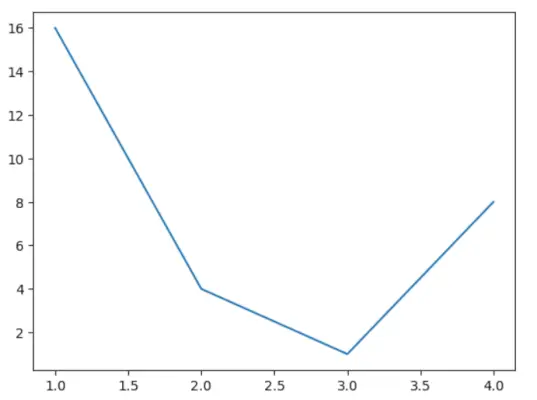
Iată un exemplu de simplu Piton cod pentru a reprezenta un grafic folosind Biblioteca Matplotlib .
Python3
# sample code> import> matplotlib.pyplot as plt> > plt.plot([> 1> ,> 2> ,> 3> ,> 4> ], [> 16> ,> 4> ,> 1> ,> 8> ])> plt.show()> |
Ieșire:

Trasează folosind Python matplotlib
Sintaxa Matplotlib subplots().
The funcția subplots(). în Modulul Pyplot din biblioteca Matplotlib este folosit pentru a crea o figură și un set de subploturi.
Sintaxă: matplotlib.pyplot.subplots(nrows=1, ncols=1, sharex=False, sharey=False, squeeze=True, subplot_kw=None, gridspec_kw=None, **fig_kw)
Parametri: Această metodă acceptă următorii parametri descriși mai jos:
- nrows, ncols: Acești parametri sunt numărul de rânduri/coloane ale grilei subplotului.
- sharex, sharey: Acest parametru controlează partajarea proprietăților între axele x (sharex) sau y (sharey).
- stoarce : Acest parametru este un parametru opțional și conține o valoare booleană cu valoarea implicită True.
- pe unu: Acest parametru este cuvântul cheie pyplot.figure care stabilește numărul sau eticheta figurii.
- subplot_kwd: Acest parametru este dict-ul cu cuvintele cheie transmise apelului add_subplot folosit pentru a crea fiecare subplot.
- gridspec_kw: Acest parametru este dict-ul cu cuvintele cheie transmise constructorului GridSpec folosit pentru a crea grila pe care sunt plasate subploturile.
Se intoarce: Această metodă returnează următoarele valori.
- smochin : Această metodă returnează aspectul figurii.
- topor: Această metodă returnează obiectul axes.Axes sau matricea de obiecte Axes.
Python Subplots Matplotlib Exemplu
În acest exemplu, vom crea o diagramă simplă folosind funcția subplots() din matplotlib.pyplot.
Python3
# Implementation of matplotlib function> import> numpy as np> import> matplotlib.pyplot as plt> # First create some toy data:> x> => np.linspace(> 0> ,> 2> *> np.pi,> 400> )> y> => np.sin(x> *> *> 2> )> fig, ax> => plt.subplots()> ax.plot(x, y)> ax.set_title(> 'Simple plot'> )> fig.suptitle(> 'matplotlib.pyplot.subplots() Example'> )> plt.show()> |
Ieșire:

Exemplu de funcție matplotlib.pyplot.subplots().
Afișarea mai multor diagrame folosind subplots()
Funcția Matplotlib subplots() ne permite să trasăm mai multe diagrame folosind aceleași date sau axa. Să vedem câteva exemple pentru o mai bună înțelegere:
Stivuirea subploturilor într-o singură direcție
În acest exemplu, vom reprezenta două diagrame care împart axa y. Parametrii nrows și ncols sunt setați la 1 și, respectiv, 2, ceea ce înseamnă că graficul va avea 1 rând și 2 coloane sau 2 subploturi. Putem accesa aceste subploturi folosind indexul [0] și [1].
Python3
# Implementation of matplotlib function> import> numpy as np> import> matplotlib.pyplot as plt> # First create some toy data:> x> => np.linspace(> 0> ,> 2> *> np.pi,> 400> )> y1> => np.sin(x)> y2> => np.sin(x> *> *> 2> )> # create 2 subplots> fig, ax> => plt.subplots(nrows> => 1> , ncols> => 2> )> ax[> 0> ].plot(x, y1)> ax[> 1> ].plot(x, y2)> # plot 2 subplots> ax[> 0> ].set_title(> 'Simple plot with sin(x)'> )> ax[> 1> ].set_title(> 'Simple plot with sin(x**2)'> )> fig.suptitle(> 'Stacked subplots in one direction'> )> plt.show()> |
Ieșire:
Stivuirea subploturilor într-o singură direcție
Stivuirea subploturilor în două direcții
Acest exemplu este similar cu cel precedent. Singura diferență este că am furnizat valorile nrows și ncols la 2. Aceasta înseamnă că plotul este împărțit în 2 rânduri și 2 coloane, ceea ce ne oferă un total de 4 subplot-uri matplotlib. Putem accesa aceste parcele folosind indexul.
Python3
# Implementation of matplotlib function> import> numpy as np> import> matplotlib.pyplot as plt> # First create some toy data:> x> => np.linspace(> 0> ,> 2> *> np.pi,> 400> )> y1> => np.sin(x)> y2> => np.sin(x> *> *> 2> )> y3> => y1> *> *> 2> y4> => y2> *> *> 2> fig, ax> => plt.subplots(nrows> => 2> , ncols> => 2> )> ax[> 0> ,> 0> ].plot(x, y1, c> => 'red'> )> ax[> 0> ,> 1> ].plot(x, y2, c> => 'red'> )> ax[> 1> ,> 0> ].plot(x, y3, c> => 'blue'> )> ax[> 1> ,> 1> ].plot(x, y3, c> => 'blue'> )> ax[> 0> ,> 0> ].set_title(> 'Simple plot with sin(x)'> )> ax[> 0> ,> 1> ].set_title(> 'Simple plot with sin(x**2)'> )> ax[> 1> ,> 0> ].set_title(> 'Simple plot with sin(x)**2'> )> ax[> 1> ,> 1> ].set_title(> 'Simple plot with sin(x**2)**2'> )> fig.suptitle(> 'Stacked subplots in two direction'> )> plt.show()> |
Ieșire:
Stivuirea subploturilor în două direcții
Axa de partajare
În acest exemplu, vom reprezenta graficele care au aceeași axă. Vom crea diagrame care vor împărtăși axa y și eticheta, dar vor avea propria lor axă x și etichetă. Acest lucru se poate face prin transmiterea unei valori la parametrul „num” al funcției subplot(). Parametrul „sharex” este setat la True, ceea ce înseamnă că diagramele create vor împărtăși axa X între ele.
Python3
# Implementation of matplotlib function> import> numpy as np> import> matplotlib.pyplot as plt> # First create some toy data:> x> => np.linspace(> 0> ,> 2> *> np.pi,> 400> )> y1> => np.sin(x)> y2> => np.sin(x> *> *> 2> )> fig, (ax1, ax2)> => plt.subplots(> 2> , sharex> => True> )> ax1.plot(x, y1, c> => 'red'> )> ax2.plot(x, y2, c> => 'red'> )> ax1.set_ylabel(> 'Simple plot with sin(x)'> )> ax2.set_ylabel(> 'Simple plot with sin(x**2)'> )> fig.suptitle(> 'Subplots with shared axis'> )> plt.show()> |
Ieșire:
Subploturi cu axă comună
Axa polară
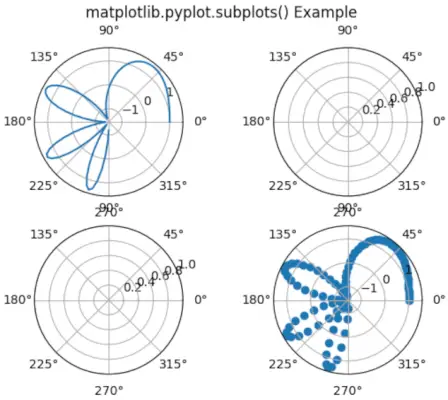
În acest exemplu, vom reprezenta graficele folosind coordonatele polare. Parametrului subplot_kw al funcției subplot() primește o valoare de dicționar a proiecției setată la „polar”, care îi spune funcției subplot() să creeze un grafic polar.
Python3
# Implementation of matplotlib function> import> numpy as np> import> matplotlib.pyplot as plt> # First create some toy data:> x> => np.linspace(> 0> ,> 1.5> *> np.pi,> 100> )> y> => np.sin(x> *> *> 2> )> +> np.cos(x> *> *> 2> )> fig, axs> => plt.subplots(nrows> => 2> , ncols> => 2> ,> > subplot_kw> => dict> (polar> => True> ))> axs[> 0> ,> 0> ].plot(x, y)> axs[> 1> ,> 1> ].scatter(x, y)> fig.suptitle(> 'matplotlib.pyplot.subplots() Example'> )> plt.show()> |
Ieșire:
Exemplu de funcție matplotlib.pyplot.subplots().