Python의 NumPy | 세트 2(고급)
Python의 NumPy | 세트 1(소개) 이 기사에서는 NumPy에서 사용할 수 있는 몇 가지 고급 방법에 대해 설명합니다.
- 배열의 순위 결정자 추적 등.
- 자신의 값이나 행렬
- 행렬 및 벡터 곱(점 내부 외부등의 곱) 행렬 지수화
- 선형 또는 텐서 방정식 등을 풀어보세요!
- http://scipy.github.io/old-wiki/pages/EricsBroadcastingDoc
- https://numpy.org/doc/stable/reference/arrays.datetime.html#arrays-dtypes-dateunits
- https://numpy.org/doc/stable/reference/routines.linalg.html
- https://glowingpython.blogspot.com/2012/03/linear-regression-with-numpy.html
import numpy as np a = np . array ([[ 1 2 ] [ 3 4 ]]) b = np . array ([[ 5 6 ] [ 7 8 ]]) # vertical stacking print ( 'Vertical stacking: n ' np . vstack (( a b ))) # horizontal stacking print ( ' n Horizontal stacking: n ' np . hstack (( a b ))) c = [ 5 6 ] # stacking columns print ( ' n Column stacking: n ' np . column_stack (( a c ))) # concatenation method print ( ' n Concatenating to 2nd axis: n ' np . concatenate (( a b ) 1 ))
Output: Vertical stacking: [[1 2] [3 4] [5 6] [7 8]] Horizontal stacking: [[1 2 5 6] [3 4 7 8]] Column stacking: [[1 2 5] [3 4 6]] Concatenating to 2nd axis: [[1 2 5 6] [3 4 7 8]]
import numpy as np a = np . array ([[ 1 3 5 7 9 11 ] [ 2 4 6 8 10 12 ]]) # horizontal splitting print ( 'Splitting along horizontal axis into 2 parts: n ' np . hsplit ( a 2 )) # vertical splitting print ( ' n Splitting along vertical axis into 2 parts: n ' np . vsplit ( a 2 ))
Output: Splitting along horizontal axis into 2 parts: [array([[1 3 5] [2 4 6]]) array([[ 7 9 11] [ 8 10 12]])] Splitting along vertical axis into 2 parts: [array([[ 1 3 5 7 9 11]]) array([[ 2 4 6 8 10 12]])]
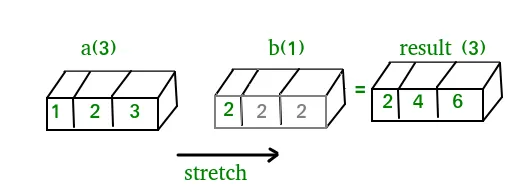
A(2-D array): 4 x 3 B(1-D array): 3 Result : 4 x 3A(4-D array): 7 x 1 x 6 x 1 B(3-D array): 3 x 1 x 5 Result : 7 x 3 x 6 x 5But this would be a mismatch:A: 4 x 3 B: 4The simplest broadcasting example occurs when an array and a scalar value are combined in an operation. Consider the example given below: PythonOutput:import numpy as np a = np . array ([ 1.0 2.0 3.0 ]) # Example 1 b = 2.0 print ( a * b ) # Example 2 c = [ 2.0 2.0 2.0 ] print ( a * c )[ 2. 4. 6.] [ 2. 4. 6.]We can think of the scalar b being stretched during the arithmetic operation into an array with the same shape as a. The new elements in b as shown in above figure are simply copies of the original scalar. Although the stretching analogy is only conceptual. Numpy is smart enough to use the original scalar value without actually making copies so that broadcasting operations are as memory and computationally efficient as possible. Because Example 1 moves less memory (b is a scalar not an array) around during the multiplication it is about 10% faster than Example 2 using the standard numpy on Windows 2000 with one million element arrays! The figure below makes the concept more clear:In above example the scalar b is stretched to become an array of with the same shape as a so the shapes are compatible for element-by-element multiplication. Now let us see an example where both arrays get stretched. Python
Output:import numpy as np a = np . array ([ 0.0 10.0 20.0 30.0 ]) b = np . array ([ 0.0 1.0 2.0 ]) print ( a [: np . newaxis ] + b )[[ 0. 1. 2.] [ 10. 11. 12.] [ 20. 21. 22.] [ 30. 31. 32.]]어떤 경우에는 브로드캐스팅이 두 배열을 모두 확장하여 초기 배열 중 하나보다 큰 출력 배열을 형성합니다.
날짜/시간 작업: Numpy has core array data types which natively support datetime functionality. The data type is called datetime64 so named because datetime is already taken by the datetime library included in Python. Consider the example below for some examples: PythonOutput:import numpy as np # creating a date today = np . datetime64 ( '2017-02-12' ) print ( 'Date is:' today ) print ( 'Year is:' np . datetime64 ( today 'Y' )) # creating array of dates in a month dates = np . arange ( '2017-02' '2017-03' dtype = 'datetime64[D]' ) print ( ' n Dates of February 2017: n ' dates ) print ( 'Today is February:' today in dates ) # arithmetic operation on dates dur = np . datetime64 ( '2017-05-22' ) - np . datetime64 ( '2016-05-22' ) print ( ' n No. of days:' dur ) print ( 'No. of weeks:' np . timedelta64 ( dur 'W' )) # sorting dates a = np . array ([ '2017-02-12' '2016-10-13' '2019-05-22' ] dtype = 'datetime64' ) print ( ' n Dates in sorted order:' np . sort ( a ))Date is: 2017-02-12 Year is: 2017 Dates of February 2017: ['2017-02-01' '2017-02-02' '2017-02-03' '2017-02-04' '2017-02-05' '2017-02-06' '2017-02-07' '2017-02-08' '2017-02-09' '2017-02-10' '2017-02-11' '2017-02-12' '2017-02-13' '2017-02-14' '2017-02-15' '2017-02-16' '2017-02-17' '2017-02-18' '2017-02-19' '2017-02-20' '2017-02-21' '2017-02-22' '2017-02-23' '2017-02-24' '2017-02-25' '2017-02-26' '2017-02-27' '2017-02-28'] Today is February: True No. of days: 365 days No. of weeks: 52 weeks Dates in sorted order: ['2016-10-13' '2017-02-12' '2019-05-22']NumPy의 선형 대수: NumPy의 선형 대수 모듈은 모든 numpy 배열에 선형 대수를 적용하는 다양한 방법을 제공합니다. 다음을 찾을 수 있습니다:Consider the example below which explains how we can use NumPy to do some matrix operations. Python
Output:import numpy as np A = np . array ([[ 6 1 1 ] [ 4 - 2 5 ] [ 2 8 7 ]]) print ( 'Rank of A:' np . linalg . matrix_rank ( A )) print ( ' n Trace of A:' np . trace ( A )) print ( ' n Determinant of A:' np . linalg . det ( A )) print ( ' n Inverse of A: n ' np . linalg . inv ( A )) print ( ' n Matrix A raised to power 3: n ' np . linalg . matrix_power ( A 3 ))Rank of A: 3 Trace of A: 11 Determinant of A: -306.0 Inverse of A: [[ 0.17647059 -0.00326797 -0.02287582] [ 0.05882353 -0.13071895 0.08496732] [-0.11764706 0.1503268 0.05228758]] Matrix A raised to power 3: [[336 162 228] [406 162 469] [698 702 905]]Let us assume that we want to solve this linear equation set:x + 2*y = 8 3*x + 4*y = 18This problem can be solved using linalg.solve method as shown in example below: PythonOutput:import numpy as np # coefficients a = np . array ([[ 1 2 ] [ 3 4 ]]) # constants b = np . array ([ 8 18 ]) print ( 'Solution of linear equations:' np . linalg . solve ( a b ))Solution of linear equations: [ 2. 3.]Finally we see an example which shows how one can perform linear regression using least squares method. A linear regression line is of the form w1 x + 승 2 = y이며 각 데이터 포인트에서 선까지의 거리의 제곱의 합을 최소화하는 선입니다. 따라서 n 쌍의 데이터(xi yi)가 주어지면 우리가 찾고 있는 매개변수는 오류를 최소화하는 w1 및 w2입니다.Let us have a look at the example below: Python
Output:import numpy as np import matplotlib.pyplot as plt # x co-ordinates x = np . arange ( 0 9 ) A = np . array ([ x np . ones ( 9 )]) # linearly generated sequence y = [ 19 20 20.5 21.5 22 23 23 25.5 24 ] # obtaining the parameters of regression line w = np . linalg . lstsq ( A . T y )[ 0 ] # plotting the line line = w [ 0 ] * x + w [ 1 ] # regression line plt . plot ( x line 'r-' ) plt . plot ( x y 'o' ) plt . show ()이것이 NumPy 튜토리얼 시리즈의 결론입니다. NumPy는 scipy scikit-learn tensorflow matplotlib opencv 등과 같은 다른 많은 계산 라이브러리의 핵심인 널리 사용되는 범용 라이브러리입니다. NumPy에 대한 기본적인 이해가 있으면 다른 상위 수준 라이브러리를 효율적으로 처리하는 데 도움이 됩니다! 참고자료:
퀴즈 만들기
마음에 드실지도 몰라요
인기 기사


범주
 In above example the scalar b is stretched to become an array of with the same shape as a so the shapes are compatible for element-by-element multiplication. Now let us see an example where both arrays get stretched. Python
  어떤 경우에는 브로드캐스팅이 두 배열을 모두 확장하여 초기 배열 중 하나보다 큰 출력 배열을 형성합니다.
  Let us have a look at the example below: Python
  이것이 NumPy 튜토리얼 시리즈의 결론입니다. NumPy는 scipy scikit-learn tensorflow matplotlib opencv 등과 같은 다른 많은 계산 라이브러리의 핵심인 널리 사용되는 범용 라이브러리입니다. NumPy에 대한 기본적인 이해가 있으면 다른 상위 수준 라이브러리를 효율적으로 처리하는 데 도움이 됩니다! 참고자료: