Matplotlib.pyplot.subplots() a Python
Matplotlib és una biblioteca en Python i és una extensió numèrica-matemàtica per a NumPy biblioteca. Pyplot és una interfície basada en estat per a un mòdul Matplotlib que proporciona una interfície semblant a MATLAB. subplots()> La funció de Python simplifica la creació de múltiples subtrames Matplotlib dins d'una sola figura, permetent la visualització organitzada i simultània de diversos conjunts de dades o gràfics.
Exemple:
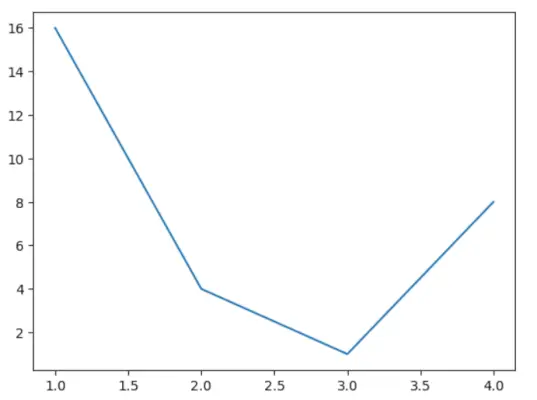
Aquí teniu un exemple de senzill Python codi per traçar un gràfic amb el Biblioteca Matplotlib .
Python 3
# sample code> import> matplotlib.pyplot as plt> > plt.plot([> 1> ,> 2> ,> 3> ,> 4> ], [> 16> ,> 4> ,> 1> ,> 8> ])> plt.show()> |
Sortida:

Traceu amb Python matplotlib
Matplotlib subplots() Sintaxi
El funció subplots(). en el Mòdul Pyplot de la biblioteca Matplotlib s'utilitza per crear una figura i un conjunt de subtrames.
Sintaxi: matplotlib.pyplot.subplots(nrows=1, ncols=1, sharex=False, sharey=False, squeeze=True, subplot_kw=Cap, gridspec_kw=Cap, **fig_kw)
Paràmetres: Aquest mètode accepta els paràmetres següents que es descriuen a continuació:
- nrows, ncols: Aquests paràmetres són el nombre de files/columnes de la graella de subtrama.
- sharex, sharey: Aquest paràmetre controla la compartició de propietats entre els eixos x (sharex) o y (sharey).
- apretar: Aquest paràmetre és un paràmetre opcional i conté un valor booleà amb el valor per defecte True.
- en un: Aquest paràmetre és la paraula clau pyplot.figure que estableix el número o l'etiqueta de la figura.
- subplot_kwd: Aquest paràmetre és el dictat amb paraules clau passats a la crida add_subplot utilitzada per crear cada subtrama.
- gridspec_kw: Aquest paràmetre és el dictat amb paraules clau passats al constructor GridSpec que s'utilitza per crear la quadrícula on es col·loquen les subtrama.
Devolucions: Aquest mètode retorna els valors següents.
- figa: Aquest mètode retorna la disposició de la figura.
- destral: Aquest mètode retorna l'objecte axes.Axes o matriu d'objectes Axes.
Exemple de subtrama de Python Matplotlib
En aquest exemple, crearem una trama senzilla utilitzant la funció subplots() a matplotlib.pyplot.
Python 3
# Implementation of matplotlib function> import> numpy as np> import> matplotlib.pyplot as plt> # First create some toy data:> x> => np.linspace(> 0> ,> 2> *> np.pi,> 400> )> y> => np.sin(x> *> *> 2> )> fig, ax> => plt.subplots()> ax.plot(x, y)> ax.set_title(> 'Simple plot'> )> fig.suptitle(> 'matplotlib.pyplot.subplots() Example'> )> plt.show()> |
Sortida:

Exemple de funció matplotlib.pyplot.subplots().
Visualització de múltiples trames mitjançant subplots()
La funció Matplotlib subplots() ens permet traçar múltiples gràfics utilitzant les mateixes dades o l'eix. Vegem uns quants exemples per a una millor comprensió:
Apilament de subtrames en una direcció
En aquest exemple, traçarem dos diagrames que comparteixen l'eix y. Els paràmetres nrows i ncols s'estableixen a 1 i 2 respectivament, el que significa que la trama tindrà 1 fila i 2 columnes o 2 subtrama. Podem accedir a aquestes subtrames mitjançant l'índex [0] i [1].
Python 3
# Implementation of matplotlib function> import> numpy as np> import> matplotlib.pyplot as plt> # First create some toy data:> x> => np.linspace(> 0> ,> 2> *> np.pi,> 400> )> y1> => np.sin(x)> y2> => np.sin(x> *> *> 2> )> # create 2 subplots> fig, ax> => plt.subplots(nrows> => 1> , ncols> => 2> )> ax[> 0> ].plot(x, y1)> ax[> 1> ].plot(x, y2)> # plot 2 subplots> ax[> 0> ].set_title(> 'Simple plot with sin(x)'> )> ax[> 1> ].set_title(> 'Simple plot with sin(x**2)'> )> fig.suptitle(> 'Stacked subplots in one direction'> )> plt.show()> |
Sortida:
Apilament de subtrames en una direcció
Apilament de subtrames en dues direccions
Aquest exemple és similar a l'anterior. L'única diferència és que hem proporcionat els valors de nrows i ncols a 2. Això vol dir que la trama es divideix en 2 files i 2 columnes, la qual cosa ens dóna un total de 4 subtrama matplotlib. Podem accedir a aquestes parcel·les mitjançant l'índex.
Python 3
# Implementation of matplotlib function> import> numpy as np> import> matplotlib.pyplot as plt> # First create some toy data:> x> => np.linspace(> 0> ,> 2> *> np.pi,> 400> )> y1> => np.sin(x)> y2> => np.sin(x> *> *> 2> )> y3> => y1> *> *> 2> y4> => y2> *> *> 2> fig, ax> => plt.subplots(nrows> => 2> , ncols> => 2> )> ax[> 0> ,> 0> ].plot(x, y1, c> => 'red'> )> ax[> 0> ,> 1> ].plot(x, y2, c> => 'red'> )> ax[> 1> ,> 0> ].plot(x, y3, c> => 'blue'> )> ax[> 1> ,> 1> ].plot(x, y3, c> => 'blue'> )> ax[> 0> ,> 0> ].set_title(> 'Simple plot with sin(x)'> )> ax[> 0> ,> 1> ].set_title(> 'Simple plot with sin(x**2)'> )> ax[> 1> ,> 0> ].set_title(> 'Simple plot with sin(x)**2'> )> ax[> 1> ,> 1> ].set_title(> 'Simple plot with sin(x**2)**2'> )> fig.suptitle(> 'Stacked subplots in two direction'> )> plt.show()> |
Sortida:
Apilament de subtrames en dues direccions
Eix compartit
En aquest exemple, representarem els gràfics que comparteixen el mateix eix. Crearem trames que compartiran l'eix Y i l'etiqueta, però tindran el seu propi eix X i etiqueta. Això es pot fer passant un valor al paràmetre 'num' de la funció subplot(). El paràmetre 'sharex' s'estableix en True, el que significa que les trames creades compartiran l'eix X entre elles.
Python 3
# Implementation of matplotlib function> import> numpy as np> import> matplotlib.pyplot as plt> # First create some toy data:> x> => np.linspace(> 0> ,> 2> *> np.pi,> 400> )> y1> => np.sin(x)> y2> => np.sin(x> *> *> 2> )> fig, (ax1, ax2)> => plt.subplots(> 2> , sharex> => True> )> ax1.plot(x, y1, c> => 'red'> )> ax2.plot(x, y2, c> => 'red'> )> ax1.set_ylabel(> 'Simple plot with sin(x)'> )> ax2.set_ylabel(> 'Simple plot with sin(x**2)'> )> fig.suptitle(> 'Subplots with shared axis'> )> plt.show()> |
Sortida:
Subtrama amb eix compartit
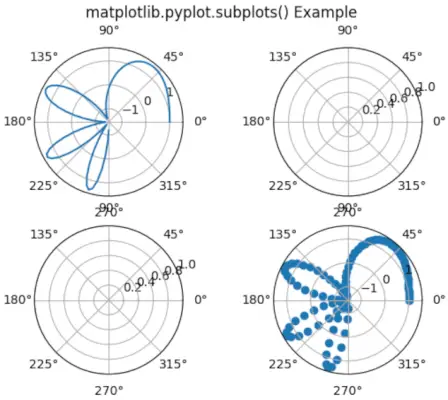
Eix polar
En aquest exemple, traçarem els gràfics utilitzant les coordenades polars. El paràmetre subplot_kw de la funció subplot() rep un valor de projecció de diccionari establert en 'polar' que indica a la funció subplot() que creï un gràfic polar.
Python 3
# Implementation of matplotlib function> import> numpy as np> import> matplotlib.pyplot as plt> # First create some toy data:> x> => np.linspace(> 0> ,> 1.5> *> np.pi,> 100> )> y> => np.sin(x> *> *> 2> )> +> np.cos(x> *> *> 2> )> fig, axs> => plt.subplots(nrows> => 2> , ncols> => 2> ,> > subplot_kw> => dict> (polar> => True> ))> axs[> 0> ,> 0> ].plot(x, y)> axs[> 1> ,> 1> ].scatter(x, y)> fig.suptitle(> 'matplotlib.pyplot.subplots() Example'> )> plt.show()> |
Sortida:
Exemple de funció matplotlib.pyplot.subplots().